BIEG(Ł) I UPAD(Ł)
STRIKE AND DIP

Dlaczego geolog leży?
Bo bieg i upad.
(klasyczny „suchar” geologiczny, autor nieznany)
Ten żart, (nie)śmieszny dla geologów, dla nie-geologa może być kompletnie niezrozumiały. A to za sprawą dwóch tajemniczych słów. Co oznaczają: bieg i upad? Czy i dlaczego są ważne? Przy okazji tego erfa nie tylko spróbujemy wyjaśnić ich znaczenie, ale pokusimy się o to, żeby nauczyć Was, jak się je mierzy. Zatem: do roboty!
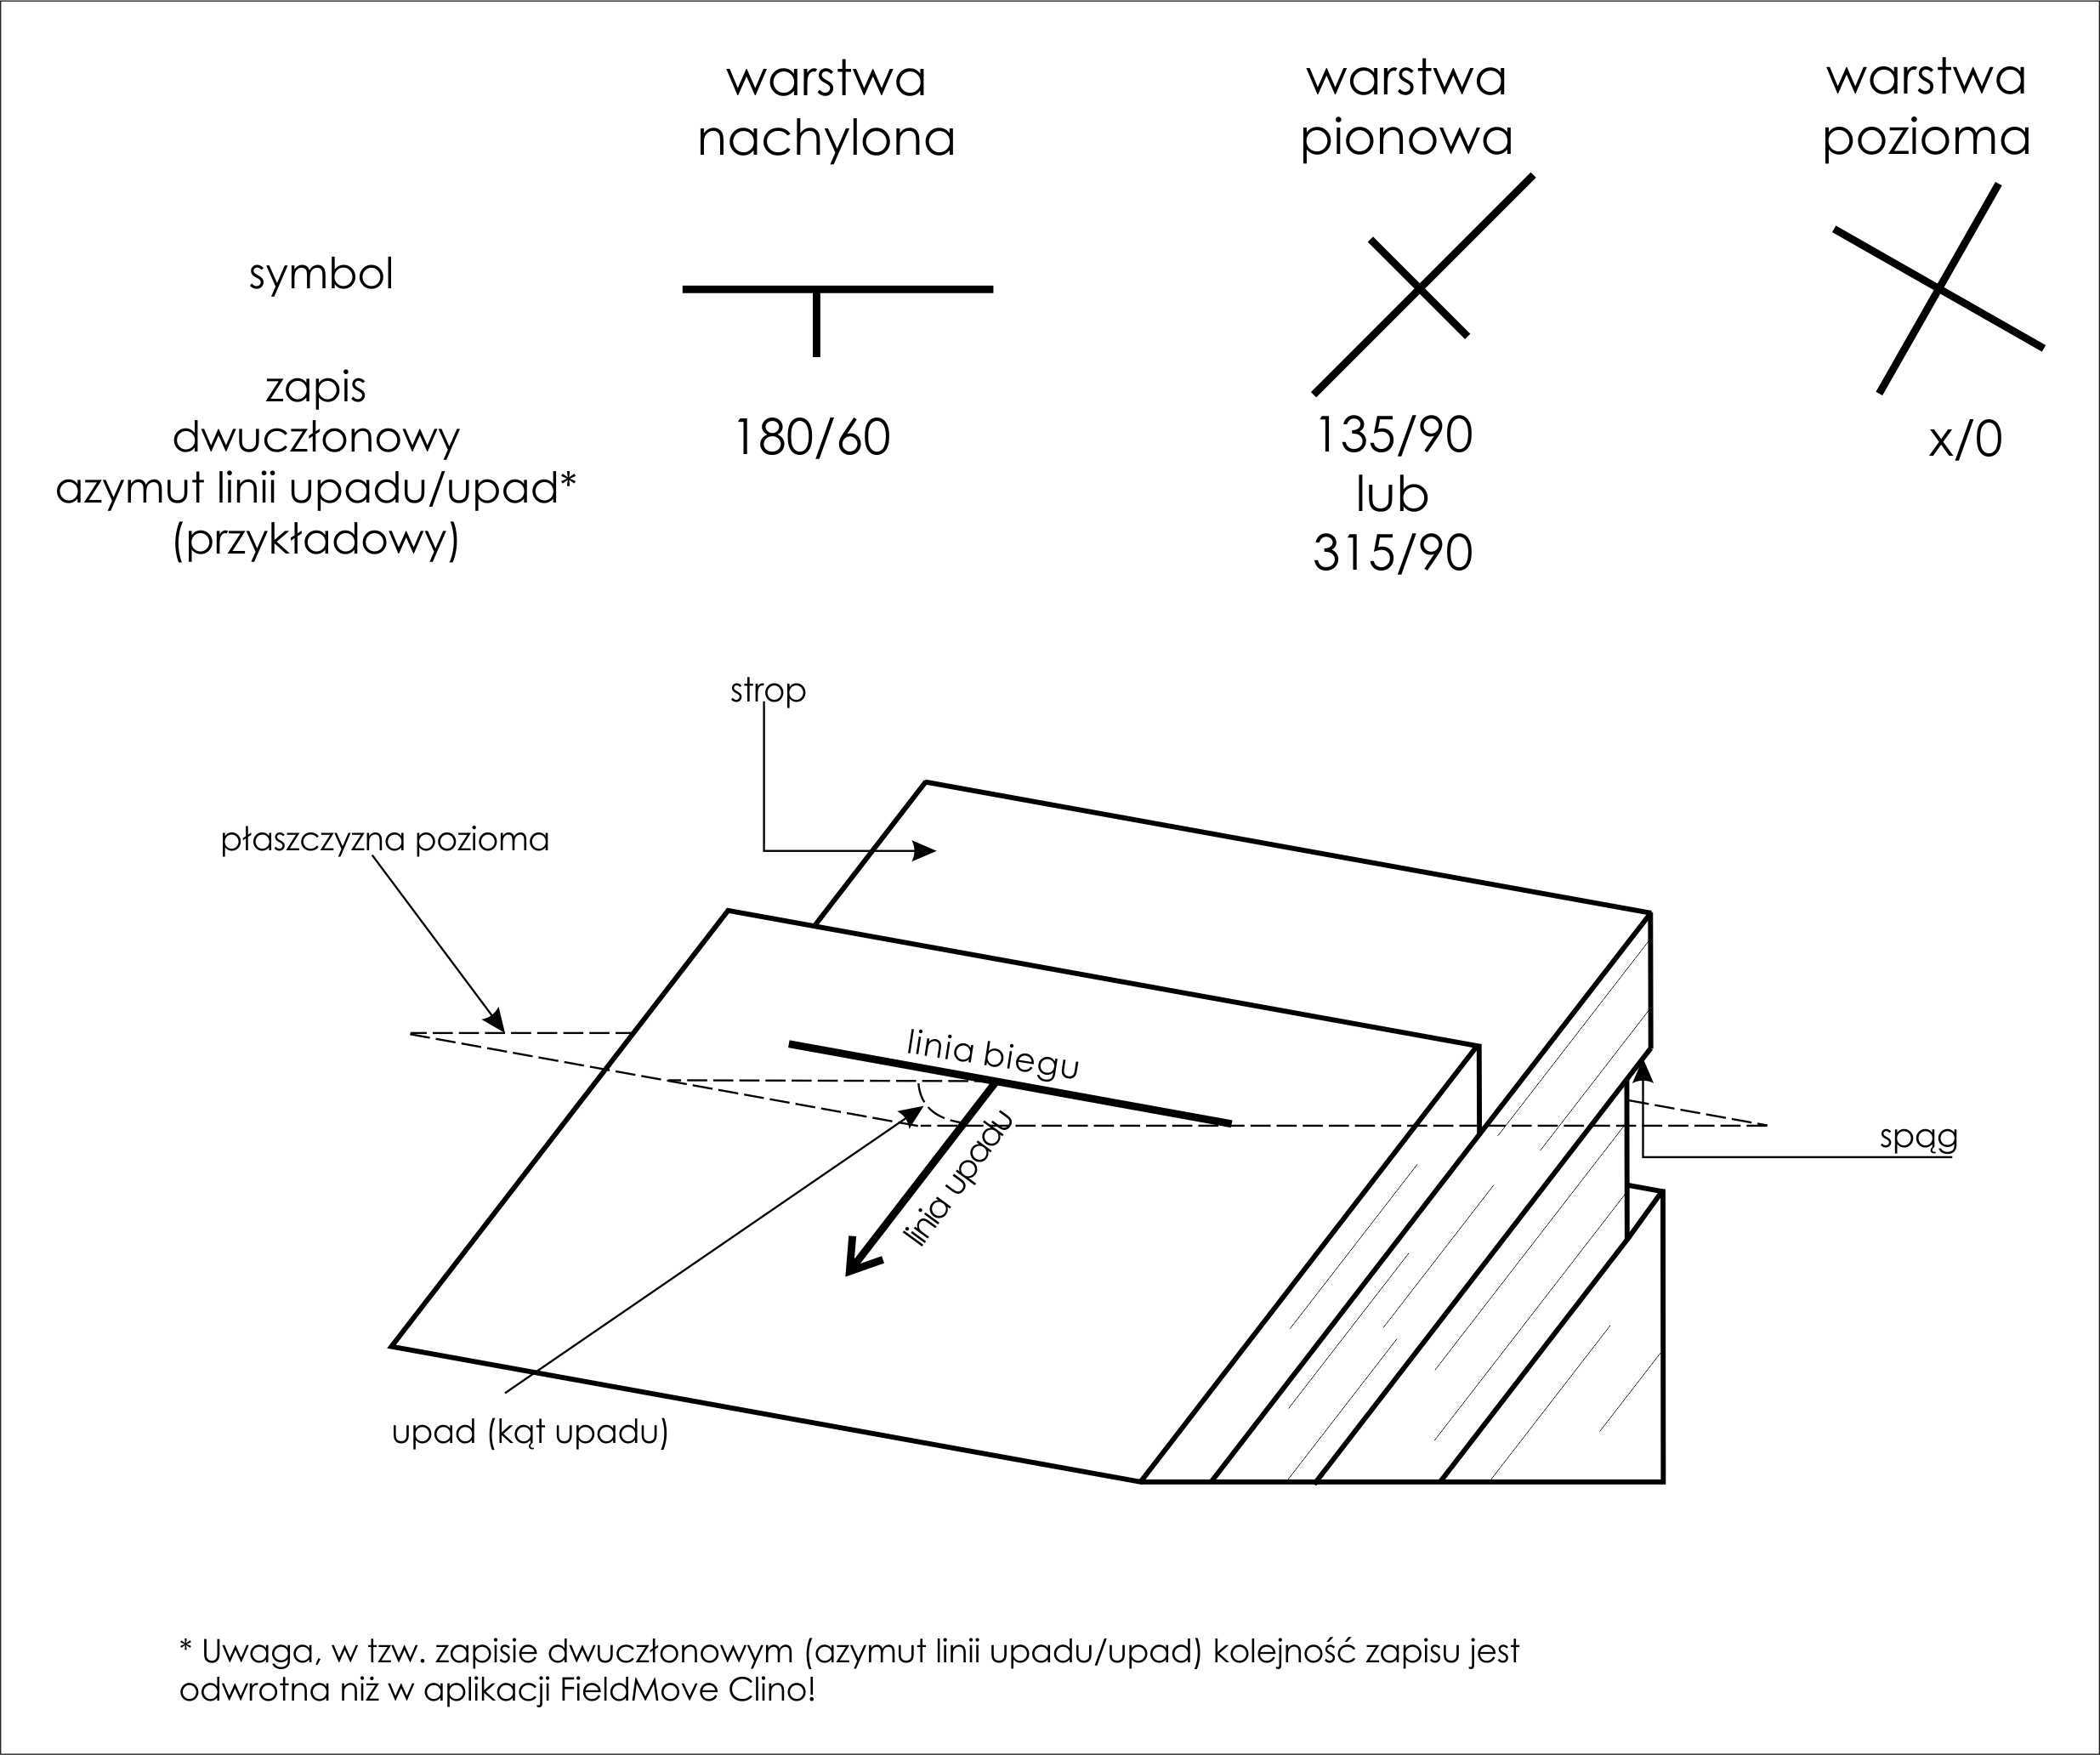
Kto zatem biegnie i kto upada? Czy jest to geolog? Wypadałoby raczej zapytać: „co biegnie?”, bo nie o geologa tutaj chodzi, a o warstwę. Mówimy więc o biegu i o upadzie warstwy (fig. 1).
Fig. 1 Schematyczny rysunek ułożonych skośnie ławic wraz z symbolami i przykładowym zapisem orientacji warstw. Rys. M. Szadkowski
O warstwach słów kilka
Tak jak cebula ma warstwy, mają je też skały. Nie wszystkie co prawda, bo głównie osadowe - jest to ich charakterystyczna cecha. W osadach oprócz warstw wyróżnia się ponadto ławice. Ławica to partia osadu, która jest oddzielona wyraźnymi powierzchniami od góry i od dołu. Często ławica zawiera w sobie wiele warstw. Można powiedzieć, że to taka „superwarstwa”
Warstwy (i ławice) są też jak szczypiorek – mogą być cienkie albo grube. Mogą mieć mniej niż centymetr, ale mogą też mieć grubość wielu metrów. Tak właściwie, to nie powinniśmy mówić o grubości, a o miąższości warstw. Jak ją zmierzyć? Bardzo prosto! Wyobraźmy sobie leżącą płasko książkę. Od góry i od dołu jest ograniczona okładką. Warstwy też posiadają coś takiego – to powierzchnia spągowa (spąg) od dołu i powierzchnia stropowa (strop) od góry. Odległość między nimi (mierzona prostopadle) to właśnie miąższość.
Tak jednak, jak książka nie zawsze leży poziomo na półce (często ustawiamy książki pod kątem lub całkiem pionowo), tak i warstwy w wyniku różnych procesów geologicznych mogą zostać osadzone pod kątem albo odchylone od swojego pierwotnego, poziomego położenia.
Bieg warstwy
O warstwach wiemy już wystarczająco wiele. Nadal jednak nie wiemy, dokąd biegnie warstwa? A raczej - jak biegnie? Jak nietrudno się domyślić, mówi nam o tym bieg warstwy. Aby łatwiej było nam to zrozumieć, pojęcie biegu można zastąpić słowem rozciągłość. Na powierzchni warstwy możemy narysować linię biegu. To ślad przecięcia dowolnej poziomej płaszczyzny z naszą warstwą. Ona pokazuje nam, jak warstwa „biegnie”. Zauważmy, że linia biegu, niczym kijek o dwóch końcach, wskazuje nam dwa przeciwstawne kierunki w przestrzeni. Oba to azymuty linii biegu. Żeby opisać bieg warstwy, wystarczy podać jeden z nich. I już! Bieg warstwy mamy wyznaczony.
Upad warstwy
Jeżeli wiemy, jak biegnie warstwa, to możemy się teraz zastanowić, jak zapada, czyli innymi słowy – jak jest nachylona. Czego tym razem potrzebujemy? Tak, potrzebny nam jest kierunek, w którym zapada warstwa oraz wartość kąta, o jaki jest nachylona. Kierunek nachylenia warstwy wyznacza nam linia upadu i – tu niespodzianka – kierunek ten jest zawsze prostopadły do linii biegu. Kąt nachylenia warstwy nazywamy upadem właśnie. Jest to kąt zawarty pomiędzy naszą warstwą a dowolną poziomą płaszczyzną.
Pomiary
Jak mierzy się bieg i upad warstw? Pomiar wykonuje się na powierzchni stropowej (najczęściej) lub spągowej warstwy albo ławicy. Zwykle geolodzy używają do tego celu urządzenia, jakim jest kompas geologiczny. Jednak obsługa kompasu wymaga pewnej wiedzy i wprawy, a czasem świeżym adeptom geologii sprawia poważny problem. My proponujemy inne rozwiązanie. Trzeba jedynie ściągnąć na swój smartfon odpowiednią aplikację (np. FieldMove Clino). Po jej zainstalowaniu upewnijmy się, że w ustawieniach (Settings: Angle convention) jest wybrana opcja Dip/Azimuth (fig. 2 A i B). Ta opcja pokazuje nam upad oraz azymut linii upadu. Żeby przejść do pomiarów, na głównym ekranie aplikacji wystarczy kliknąć w „mały” kompas z symbolem biegu warstwy (fig. 2 C). I gotowe, możemy przystępować do mierzenia (fig. 2 D).
Fig. 2 Jak używać smartfonu z aplikacją FieldMove Clino – krótka instrukcja
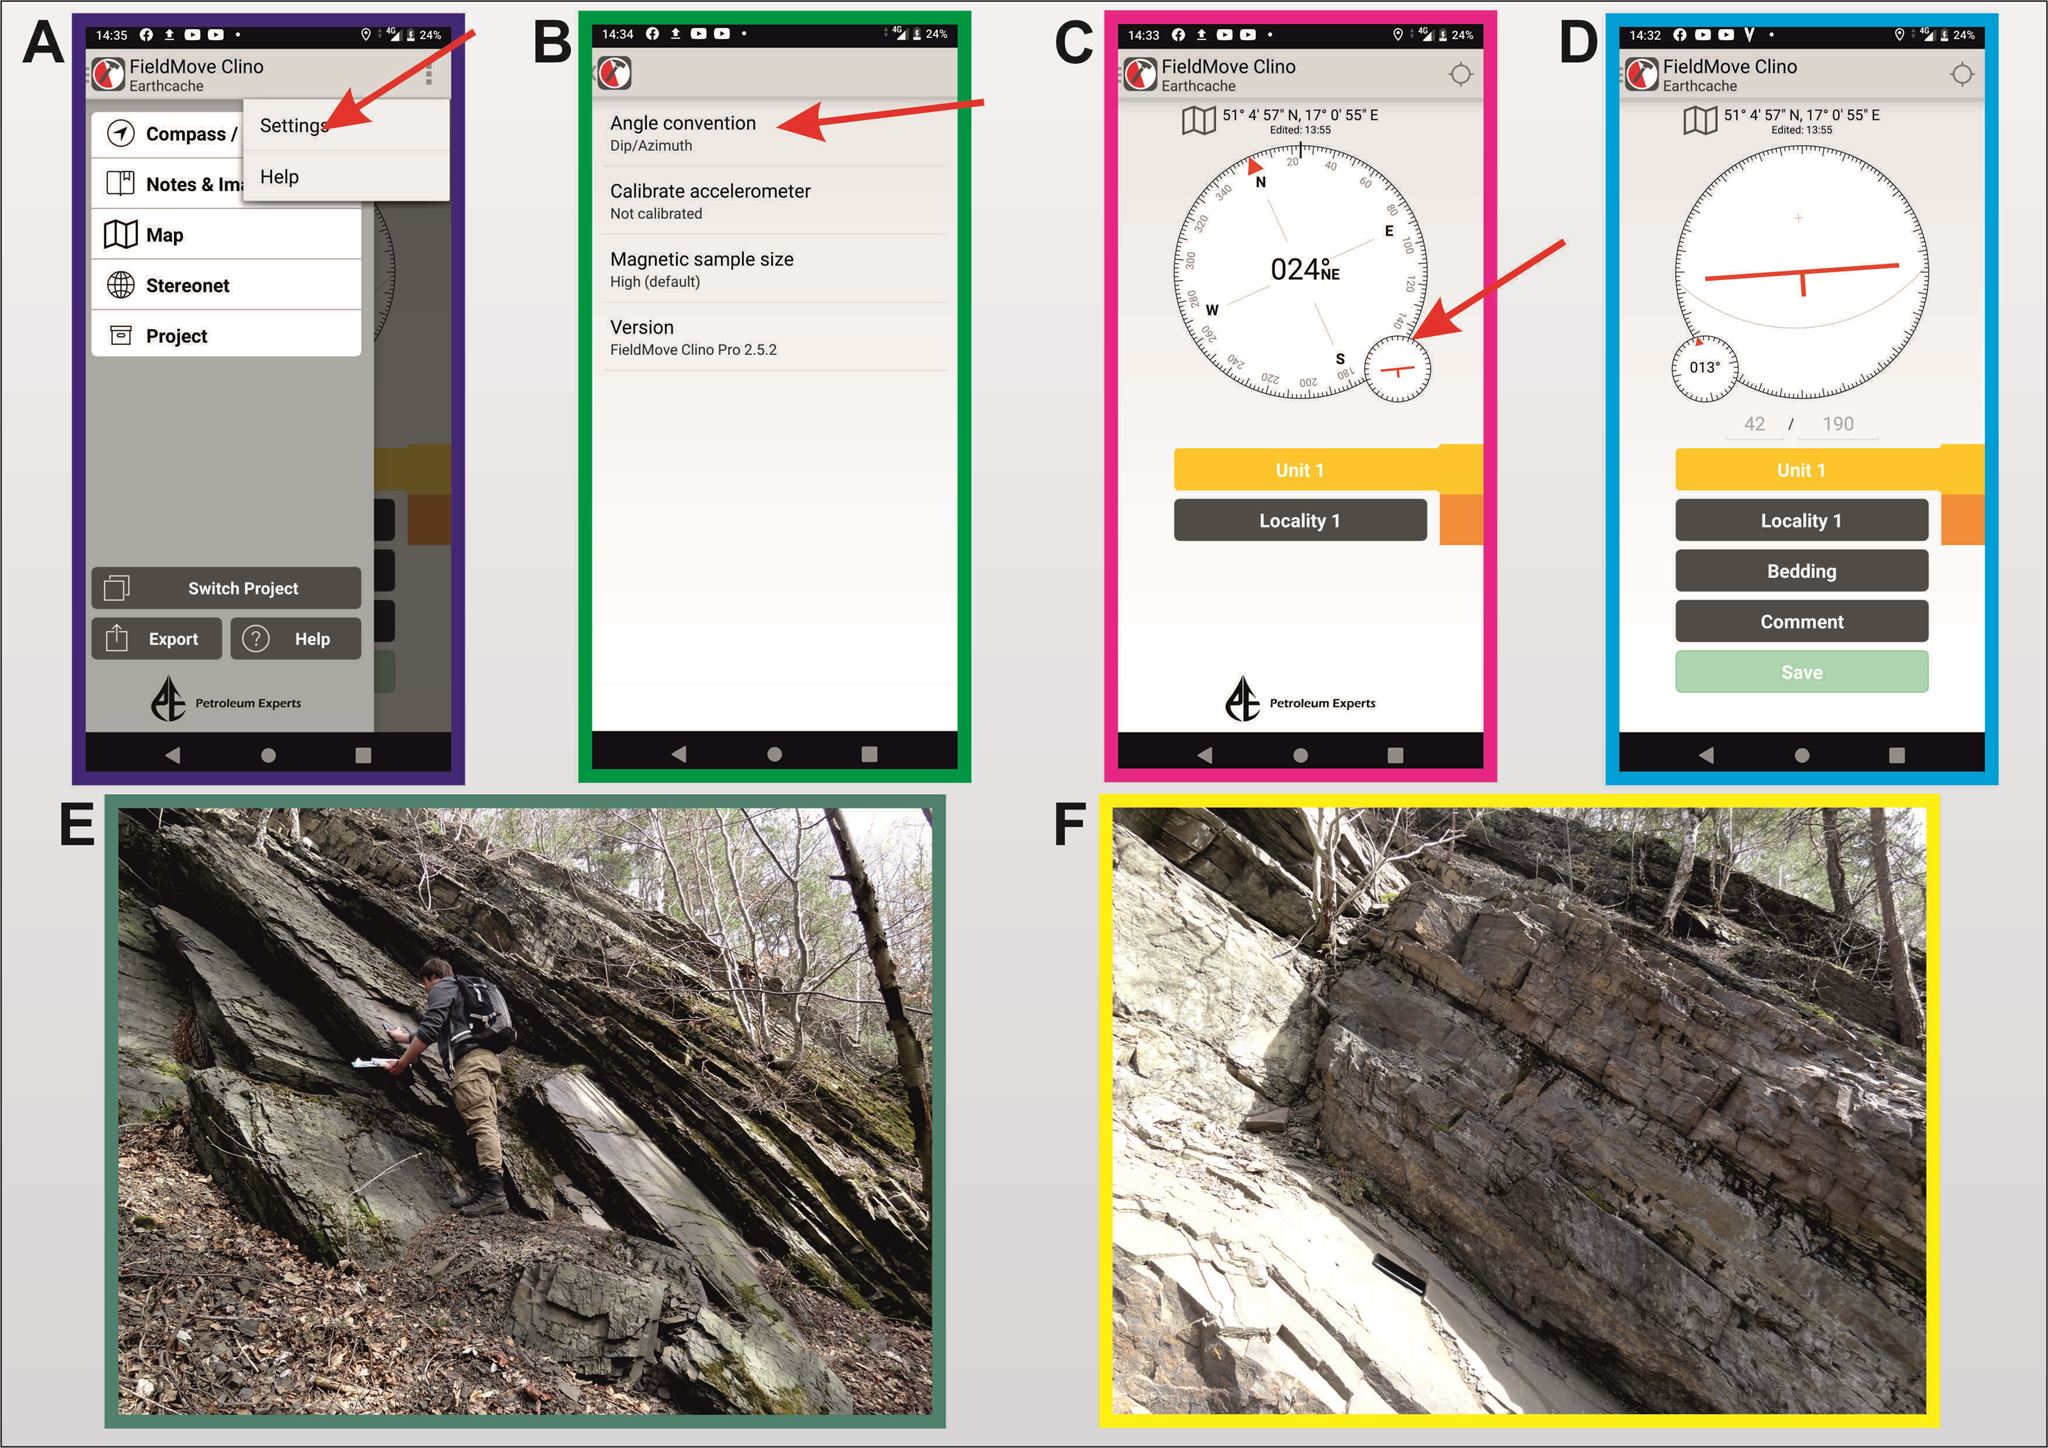
Fig. 3 Ogólny widok odsłonięcia (do zad.1 i 3). Fot. K. Zboińska
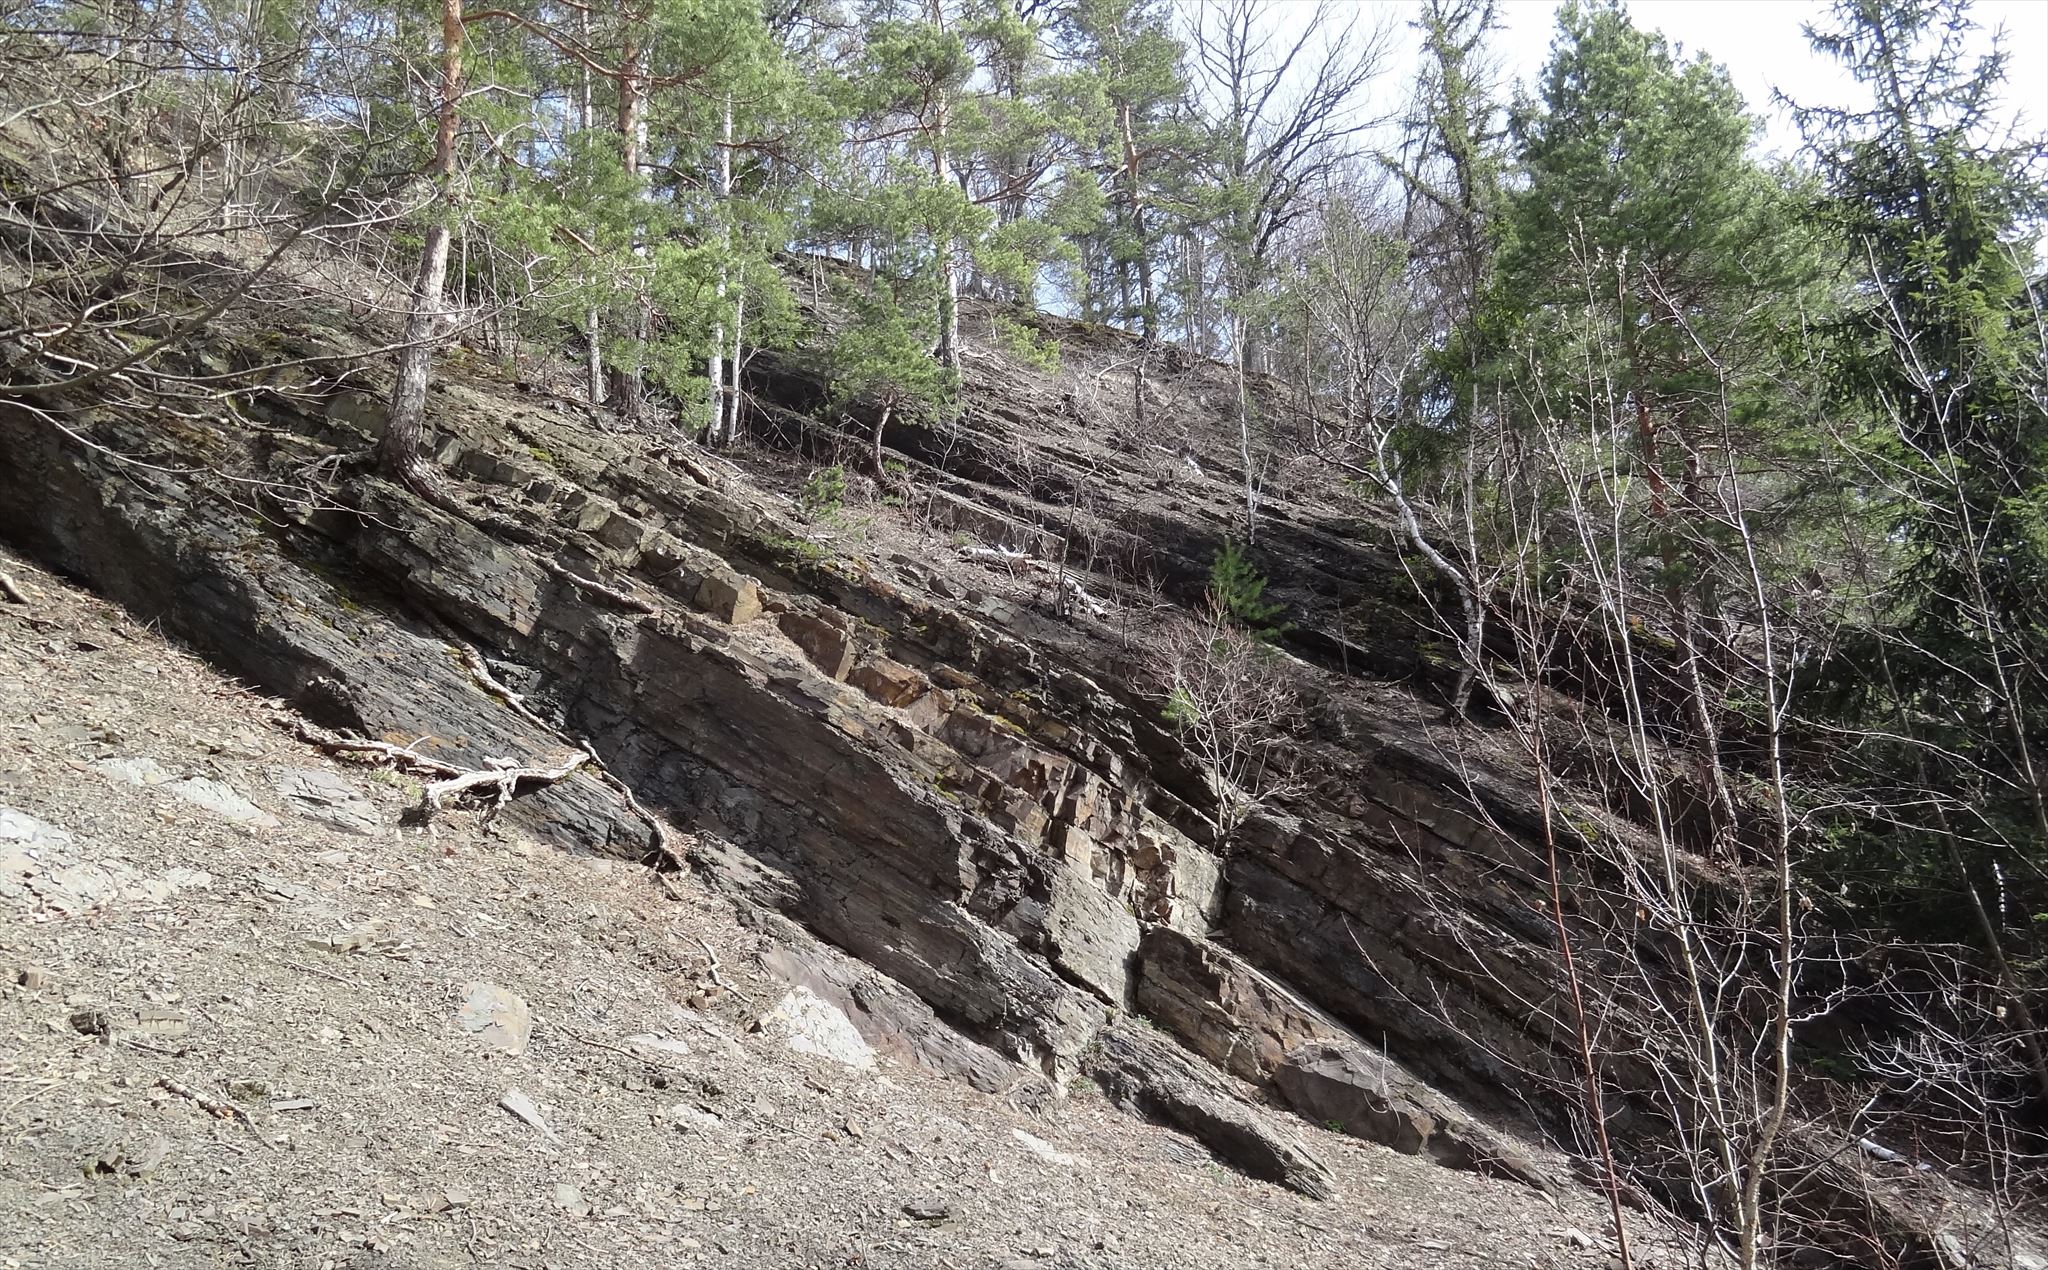
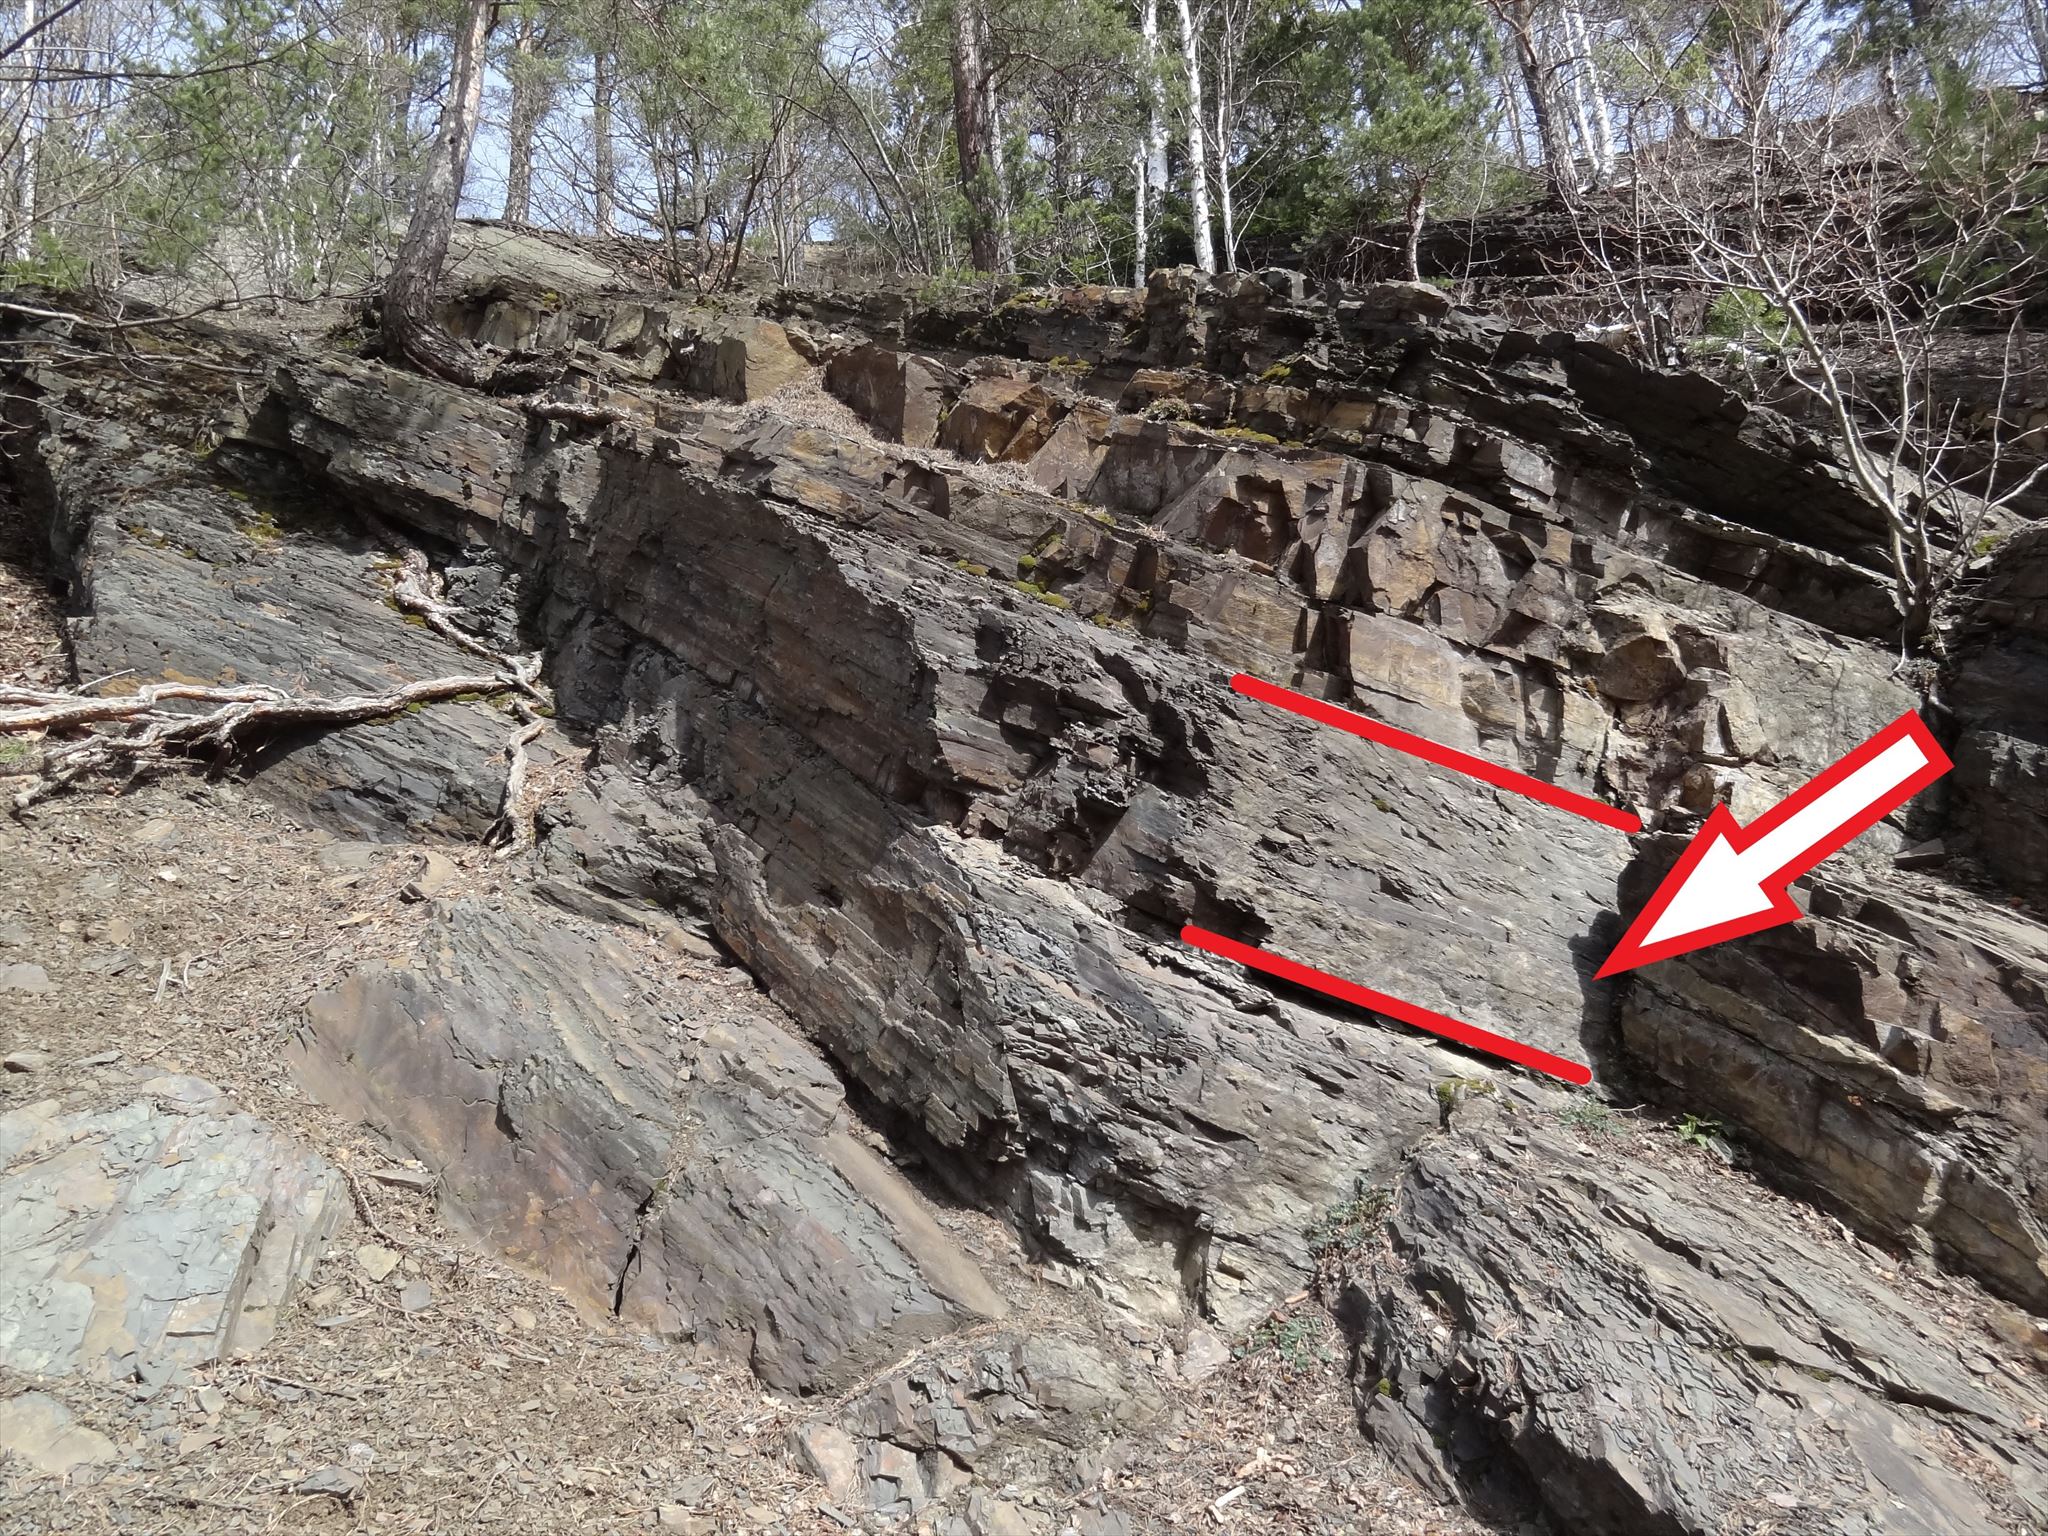
Fig. 4 Fragment odsłonięcia z zaznaczoną ławicą (do zad. 2). Fot. K. Zboińska
„Jak mierzyć?” - zapyta ktoś. Dobre pytanie. Na szczęście mierzenie orientacji warstw ze smartfonem to czysta przyjemność (jeśli tylko mamy sygnał GPS). Wystarczy położyć go płasko na powierzchni (stropowej lub spągowej) warstwy i odczekać chwilę (fig. 2 E i F). To wszystko!
Przedmioty potrzebne do zdobycia Earthcache'a:
Miara, kompas oraz dodatkowo (opcjonalnie) smartfon z aplikacją FieldMove Clino (lub kompas geologiczny, jeśli posiadasz i potrafisz się nim posługiwać)
Aby zalogować EC musisz odwiedzić miejsce i przesłać odpowiedzi na pytania:
- Spróbuj oszacować (za pomocą zwykłego kompasu) w którą ze stron świata nachylone są ławice widoczne w terenie (fig. 3).
- Jaka jest miąższość ławicy wskazanej strzałką na zdjęciu (fig 4)? Dołącz zdjęcie ilustrujące, w jaki sposób został wykonany pomiar. Oznacz strop ławicy, kładąc na nim jakiś przedmiot.
- Zadanie opcjonalne (dla ciekawskich): wykonaj kilka pomiarów azymutu upadu oraz kąta upadu ławic, które widzisz w odsłonięciu (fig 3). Najlepiej wykonaj pomiary dla różnych ławic i prześlij nam uśrednione wartości. Podpowiedź: pomiary przeprowadzaj na powierzchniach stropowych, które są doskonale odsłonięte.
UWAGA! Do zalogowania tej skrytki EarthCache wymagane jest wysłanie odpowiedzi do zadań przez profil PIG_PIB. Logować można po wysłaniu rozwiązań, nie czekając na wiadomość z naszej strony. Logi bez wysłanych odpowiedzi będą kasowane w ciągu 14 dni.

What do strike and dip mean? Are they important and why? On the occasion of this cache, we will not only try to explain their meaning, but we will try to teach you how to measure them. So: go to work!
We are talking about the strike and the dip of the layer (fig. 1). So:
A few words about layers
Just as the onion has layers, so do rocks. Not all of them, because they are mainly sedimentary - this is their characteristic feature. In the sediments, apart from the layers, there are also beds. The bed is a batch of sediment that is separated by distinct surfaces at the top and bottom. Often the bed has many layers within it. It can be said that it is such a "super layer".
Layers (and beds) are also like chives - they can be thin or thick. They can be less than a centimeter or many meters thick. Actually, we should not be talking about thickness, but about thickness of the layers. How to measure it? Very simple! Imagine a book lying flat. It is limited by a cover at the top and bottom. The layers also have something like this - it is the floor surface (floor) from the bottom and the upper surface (top) from the top. The distance between them (measured perpendicularly) is precisely the thickness.
However, just as a book does not always lie horizontally on a shelf (we often place books at an angle or completely vertically), the layers, as a result of various geological processes, may be embedded at an angle or deviated from their original, horizontal position.
Bed strike
We already know enough about layers. But we still don't know where the layer goes? As you can easily guess, the bed strike tells us about it. We can draw a strike line on the surface of the layer. This is the trace of the intersection of any horizontal plane with our layer. Notice that the line of the strike, like a stick with two ends, shows us two opposite directions in space. Both are strike line azimuths. In order to describe the strike of a layer, it is enough to mention one of them. And now! We have determined the bed strike.
Dip
If we know how the layer runs, we can now consider how it collapses, in other words, how it is dipped. What do we need this time? Yes, we need the direction in which the layer dips and the value of the angle by which it is inclined. The direction of the inclination of the layer is determined by the dip line and - surprise here - this direction is always perpendicular to the strike line. The angle of inclination of a layer is called a dip. It is the angle between our layer and any horizontal plane.
Measurement
How are the strike and dip of beds measured? The measurement is performed on the top (most common) or bottom layer or bed. Typically, geologists use a geological compass for this purpose. However, using the compass requires some knowledge and practice, and sometimes it is a serious problem for new geology adepts. We propose a different solution. You only need to download the appropriate application (eg FieldMove Clino) to your smartphone. After installing it, make sure that the Dip / Azimuth option is selected in Settings: Angle convention (fig. 2 A and B). To go to the measurements, on the main screen of the application, just click on the "small" compass with the symbol of the bed strike (fig. 2C). And ready, we can start measuring (fig. 2 D).
"How to measure?" someone will ask. Good question. Fortunately, measuring the orientation of the layers with a smartphone is pure pleasure (as long as we have a GPS signal). It is enough to lay it flat on the surface of the layer and wait a while (fig. 2 E and F). That's all!
To log the EC you need to visit the place and send answers to the questions:
- Try to estimate (using an ordinary compass) in which side of the world the beds visible on the ground are inclined (fig. 3).
- What is the thickness of the bed indicated by the arrow in the photo (fig 4)? Attach a photo illustrating how the measurement was taken. Mark the top of the bed by placing an object on it.
- Optional task (for the curious ones): take a few measurements of the dip azimuth and the dip angle of the beds that you see in the exposure (fig 3). It is best to take measurements for different beds and send us the average values. Hint: measurements should be made on top surfaces that are perfectly exposed.
WARNING! To log this EC you have to send the answers to PIG_PIB profile. You can log after sending the answers, without waiting for our reply. Logs without answers will be deleted within 14 days!
Grafika w tle / Background graphics: Pixabay.com