Hawkesbury Heights #3 Big Jims Point Traditional Cache
Hawkesbury Heights #3 Big Jims Point
-
Difficulty:
-

-
Terrain:
-

Size:  (large)
Please note Use of geocaching.com services is subject to the terms and conditions
in our disclaimer.
This cache is my 40th hide! However that is including a few events, a couple of archived caches which I have since put a container in the same spot and a lab cache. So really, its somewhere about the mid thirties. Anyway, enough boasting from me!
This cache will take a little planning and some good weather. As it is a fairly long walk, you will need to bring the water, some food and all the rest. A few years ago (I am still not sure whether it was muggle days or not), dad and I found a brilliant book with walks all over the Central Coast and Yengo region. We completed many of them, but the walk out to Big Jim’s Point was a definite highlight from the book. Sadly, shortly after we completed this walk we lost the book! Ever since, I had been vowing to get back out to this truly amazing place. Only about two weeks ago, I found a rather large container in the backyard. After a short think as to where I could place this (there aren’t too many places left close to home now!) I thought of Big Jim’s point. After contacting Seaeagles1997 and Alturners, we agreed to come out here for an overnight trip. After traversing many mountains on a questionable route, we got to where dad and I had got to a few years ago.

After a short discussion, we came to the conclusion that this was not ‘Big Jim’s Point’ at all! The map showed that we were only halfway to where I though we were! After some initial reluctance, we agreed to continue onwards from what we called ‘Little Jim’s Point’ to ‘Big Jim’s Point’ After another 30min or so, we began to get some breathtaking views of the river below:

This spot was a little windy, so we continued along the ridge another 5minutes. This spot was more picturesque. It was here that I decided to pull out the surprise I brought for us to enjoy once we got down to our destination:

After some scrambling, we found a good spot to hide the rather big container, which I was more than happy to offload!


From standing ontop of the small alcove that the cache was hidden in, we got this view:

Interestingly, you can see where the 2dogs cache ‘Tower 126’ is located in this image. On the other side of this point, you could see down to Bar Point, where #1 and #2 of the series are:

Now for some more information on how to get here. There are a couple of places to park. The parking coordinates are where we parked, probably the best spot if you choose to do this as an overnight trip. This spot is off the road and out of sight of anyone passing by. The only negative to this is approach is that it will take a good 20min walk to get to the trail head. Day walk people can most likely find a spot quite close to the trailhead. From the trail head, walk down the single track and turn left when it reaches the fire trail. From here, follow this track all the way to a sharp bend just north of ‘Little Jims Point’. Here, we highly recommend that you go to the waypoint as there are some fantastic views from here. After this brilliant spot, continue along the fire trail. Probably best to pass Hawkesbury Heights #4 for now, best to do it after #3. Continue out to the power lines and then the cache from there.
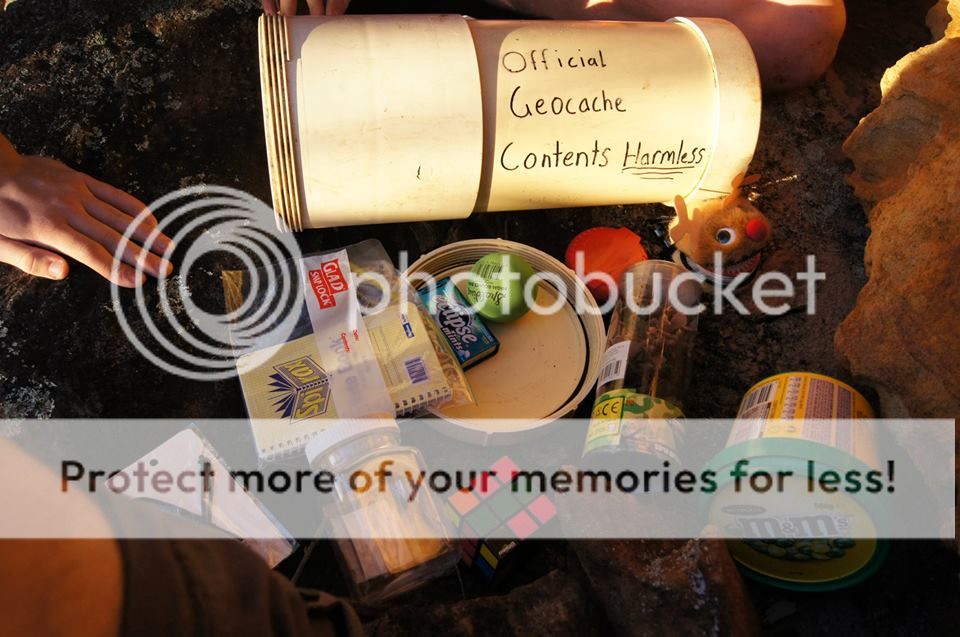
The cache itself is probably as small as a large gets I suppose. As seen in the image above, the container is well stocked with swaps and containers. Please trade evenly. The container is located in a small alcove below the top rock but it is not at the base of this small escarpment. The container is under a ledge in this alcove, covered by a rock that looks a little out of place. Please re hide the cache so that it is not able to be seen from above as there is muggle activity here. Leave about an hour to walk in, about an 1/2 an hour for admiring the views and looking around GZ. Take 3/4 an hour for completing and exploring #4 of the series. Take another hour for getting back. As the walk is on firetrail, it is possible to mountain bike to get here.
A thankyou to Seaeagles1997 and Alturners for the photography, a ride here and great company. We thoroughly enjoyed our walk out here and hope that you will too!
Happy Caching!
Additional Hints
(No hints available.)