A Walk Through Houston's History - Part 2

Welcome to Sam Houston Park, home to the Heritage Society, which is a museum complex that collects, preserves, exhibits, and celebrates the diverse history of the Houston region. Along with a museum that has permanent and temporary exhibits, the Heritage Society also operates ten historic structures, dating from 1823 to 1905, throughout Sam Houston Park.
Besides the historic structures, there are also many memorials, statues, sculptures and fountains located throughout the park. To learn more about the items, Sam Houston Park and the Heritage Society, simply click on their names anywhere on this page and you will be directed to websites that contain more information.
This is 1 of 4 "Walk" caches that we have placed here in the downtown area. The other 3 being "A Walk in Space", "A Walk Through Houston's History - Part 1" and "A Walk Through Houston's History - Part 3". We know that these four caches are a lot of work, especially during Houston's typical hot and humid climate, so we're going to reward you with a collectible Geocoin once you've completed all of four of them!
And finally, a special thanks to the Heritage Society for allowing me to place this cache in the park!
As shown in the map below, the Park is divided into 3 sections. Section 1 contains the parking lot (free, but limited space) and the Kellum-Noble House. Section 2 contains a few more historic structures and memorials along with the Heritage Society's admin offices and Museum. And Section 3 contains the main bulk of the historic structures along with a statue, fountains, the Armillary Sphere and public restrooms.
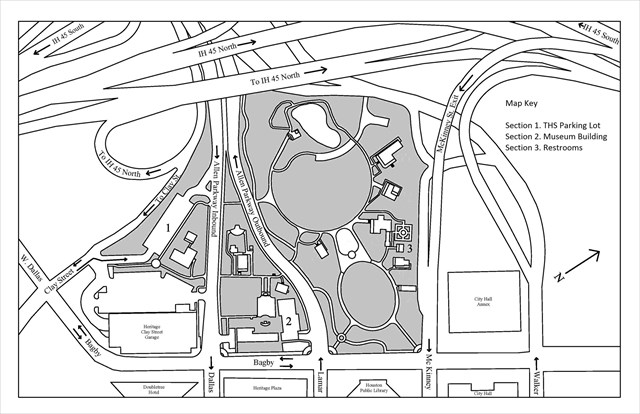
Click here for a larger version of this map
To locate this cache, you will be making stops throughout Section 3 of the park, gathering numbers that will help lead you to the cache's location. Following the steps below, you will need to locate the items listed and answer their corresponding questions.
Cache Notes:
- Sam Houston Park is open from dawn to dusk. The Heritage Society Museum gallery is open Tuesday through Saturday from 10am to 4pm. (Admission is free.) The Heritage Society parking lot is open for Heritage Society visitors 8:30 a.m.-5 p.m., Monday-Saturday. There are public restrooms in the Museum, located in Section 2 of the park, and over by the Armillary Sphere, located in Section 3.
- You can download a question and answer chart by clicking on the "Related Web Page" link on this page.
- The cache is not located at the listed coordinates, but they will lead you to the first part of the puzzle.
- The steps needed to solve this cache were laid out to minimize the amount of walking that you will need to do. However, feel free to start and end wherever you like. All of the items that you need to locate are easy to find.
- The cache that you are looking for is a camouflaged, waterproof lock and lock container located somewhere in Section 3 of the park.
- Depending on the time of day, there may be many muggles around so use stealth when searching for the cache and please replace it back exactly as you found it.
Now, on to the hunt!
Stops 1-5 are in "A Walk Through Houston's History - Part 1"
Stop 6 - Go to N 29 45.569 W 095 22.242
You should find yourself on the northwest corner of Lamar and Bagby. Locate and read the "Sam Houston Park" sign just outside of the gate.
- Answer #19, or A19 = The number of acres that the park originally covered.
Now enter the park and at the junction, follow the circular sidewalk to the right until you come to the group of trees surrounding a fountain on your left and a small white house on your right.
Stop 7 - Neuhaus Fountain and The 4th Ward Cottage
Neuhaus Fountain - Locate the coyotes, around the fountain, and the metal benches, located within the large, circular side walk that surrounds this area of the park.
- Answer #20, or A20 = Add the number of coyotes to the number of benches.
4th Ward Cottage - Locate the windows on the front and west (left) side of the house.
- A21 = The number of panes of glass in the front window plus the number of panes of glass in the smallest window on the west (left) side of the house.
Number check! A19+A20+A21 should equal 36.
Now head towards the house to the west (left) of the 4th Ward Cottage.
Stop 8 - The Yates House, Armillary Sphere and The Staiti House
In front of you is the Yates House, with the Armillary Sphere and The Staiti House to the west (left).
The Yates House - Count the number front doors. Then count the number of windows on the east (right) side of the house.
- A22 = The number of east side windows minus the number of front doors.
Armillary Sphere
- A23 = Add the number of benches around the Sphere to the number of bolts that holds the Sphere to its base.
Staiti House
- A24 = Add the number of windows that border the chimney to the number of lights on the front porch.
Number check! A22+A23+A24 should equal 15.
From the front of the Staiti House, continue northwest down the sidewalk.
Stop 9 - The San Felipe Cottage and the Pillot House.
San Felipe Cottage
- A25 = The number of second story windows.
Pillot House - Note the number of dogs by the front porch and then count the chimneys on the house.
- A26 = The number of dogs by the front stairs plus the number of chimneys on the house.
Continue west along the sidewalk, around the pond and then southeast to the stairs.
Stop 10 - The Stairs - This stop had to be changed after the Spirit of the Confederacy statue was relocated.
- A27 = Count the number of stairs leading up and away from the pond. Subtract 2 and then divide by 5.
Number check! A25+A26+A27 should equal 16.
If you have not already done so, head southeast, up the stairs, and make your way to the fountain up ahead of you.
Stop 11 - Scanlan Fountain
- A28 = The number of goat heads on the fountain.
Continue east along the sidewalk towards the church.
Stop 12 - St. John Church
- A29 = The number of front porch steps plus the number of windows on the south (right) side of the Church.
Number check! A28+A29 should equal 17.
Time for math!
|
The North Coordinates are AB CD.EFG, where...
|
|
A =
|
A19 - A23
|
|
B =
|
A24 + A25
|
|
C =
|
A27 - A22
|
|
D =
|
A28 - A24
|
|
E =
|
A21 - A26 - A27
|
|
F =
|
A23 - A25
|
|
G =
|
A25 - A26
|
|
The West Coordinates are HIJ KL.MNO, where...
|
|
H =
|
A28 - A22 - A20
|
|
I =
|
A21 - A20
|
|
J =
|
A19 - A28
|
|
K =
|
A27 - A24
|
|
L =
|
A21 - A29 - A26
|
|
M =
|
A29 - A25
|
|
N =
|
A19 - A20 - A26
|
|
O =
|
A26 - A24
|
Now that you have the coordinates, it's time to find the cache! Here are a few final notes...
You will not need to enter any of the structures to find the cache. Nor will you need to go onto any of the porches or move anything on the porches to find the cache.
Due to the sensitive nature of the outdoor displays, we feel that we need to give a pretty specific hint to make sure overzealous cachers (like us at times) don't damage or otherwise disrupt anything in this park.
However, since we don't want cachers to just read the hint and go straight to the cache without completing all of the steps, we're going to "encrypt" it in the same manner that we did the coordinates. That way you'll have to work for both of them. And since you usually need a pretty specific hint for downtown caches anyway, due to signal interference from the buildings, we don't feel bad about giving one. So you're also getting a bonus puzzle as part of this cache, albeit an easy one.
Like the coordinates, we'll encrypt the clue with the A1, A2, A3, etc... codes. You'll then have to simply substitute the number that they represent with its corresponding letter of the alphabet.
For example if the clue was "A1 A2 (A3+ A4) A5"
And you had previously figured out that...
A1 = 20 , A2 = 18, A3 = 4, A4 = 1, and A5 = 5
Then A1 would equal the 20th letter of the alphabet, which is "T", A2 would equal the 18th letter, "R", (A3 + A4) would = (4+1), or 5, which would equal "E" and A5 would also equal "E", since its value is also 5.
And once done you would come up with the word "TREE".
Don't forget, once you've completed all 4 of our "Walk" caches, contact us and you'll get a collectable Geocoin!