|
Introduction
Mangere Mountain was formed in a violent series of events about 18,000 years ago. The age of the volcano is known because wood samples from below the mountain's lava flows have been carbon dated. The total lava output from the volcano was 45 million cubic metres.
Lava flows from Mangere Mountain reach across the Manukau harbour almost to Onehunga, and about 200m short of the Hillsborough shoreline. Ambury Park sits on the lava flows and exhibits lava caves formed as lava flows from Mangere Mountain cooled on the outside while still flowing, red hot, through the centre. The depth of the lava flows varies and in a number of places there are multiple lava flows stacked on top of each other. In the vicinity of the Mangere Bridge, the lava flow is less than one metre thick.
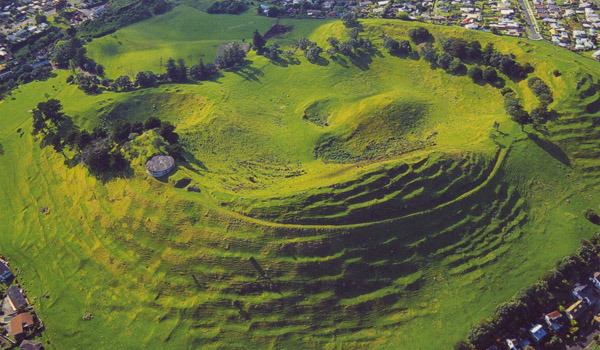
Mangere Mountain is quite unique in the Auckland volcanic field in that it is the only volcano that has a lava dome, or tholoid, in the crater where the main vent has been plugged, but hot gases and pressure from below have blistered the surface upwards forming the steep dome. The mountain is relatively unmodified, although some quarrying has taken place. It is also one of the largest scoria cones in the Auckland field.
Curiously, the Mangere Mountain volcano erupted during an ice age, so the lava may very well have been flowing through snow and ice. There was also no Manukau or Waitemata harbours at the time, and the lava flows will have been through largely flat forested terrain.
Field Trip
The best place to park, and therefore to start this field trip is at the parking waypoint listed below. From here it is a short walk to WP1 (the published coordinates) where you will need to answer the following question:
WP1: What feature of the volcano are you standing on right now? You will find out this answer at one of the other waypoints you'll visit in the course of this field trip, but you'll need to spot it, so pay attention!
During the course of this field trip, at some time while walking around the listed waypoints, please undertake the following task:
At some point, please take at least one photo of a geological feature of the volcano, and include your GPS unit in the photo. This photo should be uploaded with your online log.
Make your way to WP2. When you arrive at WP2, you will be standing at the bottom of the secondary explosion crater. Answer the following question:
WP2: What is the elevation of the bottom of this explosion crater?
Make your way to WP3. When you arrive at WP3, you will be standing at the bottom of the main explosion crater. Answer the following questions:
WP3: Describe the terrain in the bottom of this crater.
WP3: What is the elevation of the bottom of the main explosion crater?
Leave the main explosion crater, back track around past the secondary explosion crater, and ascend the lava dome to WP4. At WP4 you are standing on top of the lava dome in the main crater. This dome was created by a plug forming in the main event, and blistering upwards from the heat and pressure below. At WP4, please answer the following question:
WP4: What is the elevation of the top of the lava dome?
Continue on from WP4 to WP5 on the western rim of the volcano. At WP5 you can look across the Manukau Harbour towards the Manukau Heads. Nearby is an information board, from which you will be able to answer the following question:
WP5: What is the name of the stonefields that can be seen from this spot?
From WP5, follow the steep ridge up to the trig station. on the way to WP6 you will pass by some obvious manmade modifications to the volcano from when it was a Maori Pa site - terraced defenses and kumara storage pits. When you arrive at WP6, one of the volcano's peaks, answer the following questions:
WP6: What is the elevation from sea level of this peak?
WP6: What is the four character code on the geodetic marker plaque?
Continuing on from WP6, you will soon find yourself at WP7, where you will find View Point 3 - another information panel. From this information panel please answer the following question:
WP7: On what are you now standing?
A short walk from WP7 is WP8, the northern peak of the volcano. At WP8, please answer the following questions:
WP8: What is the elevation of this peak?
WP8: What is the four character code on the geodetic marker plaque here?
You can now head straight back down the hill from WP8 to WP1 (the published coordinates) again. Along the way, please answer this final question:
WP1: On the way down to WP1 from WP8, you passed a large volcanic feature, on your left as you descended - describe this geological feature.
In order to claim a find on this earthcache you must email the cache owner with the correct answers to all of the above questions. When you log your find online, you must upload the required photo also. Without the answers emailed, or the required photo, your log may be deleted.
You can log this cache straight away after you have emailed your answers to the cache owner, no need to wait for confirmation. Please include the name of this earthcache in the email - you'd be surprised how many people forget. Also, when contacting us with answers, if you want a reply, please include your email address. Any problems with your answers we'll be in touch.
Happy Earthcaching!
|