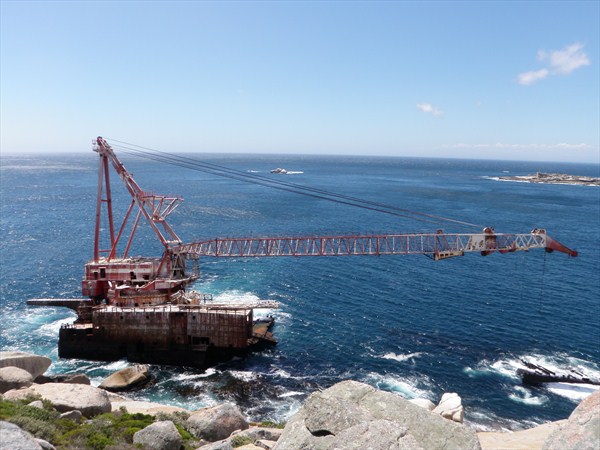
The Wreck
At the time, the Bos 400 was the largest crane barge in Africa at approximately 100m long. She was under tow by the Russian tug Tigr having almost completed a journey from Pointe-Noire in the Republic of Congo to Cape Town, South Africa. On the 26th June 1994 during a north westerly gale, the tow parted causing the vessel to run aground off Duiker Point in Maori Bay (so called because of the wreck of the SS Maori nearby). Despite several towage attempts, the shipwreck was considered a total loss as salvors were able to recover little from the wreck. The "http://www.artificialowl.net/2008/05/shipwreck-of-bos-400-maori-bay-south.html"> following article gives a little more detail and also has some photos of the wreck soon after it was sunk (compare them to those below to see how the wreck has changed over the years).
Getting There
Unless you are superman or fancy a long hike with all your gear followed by a tricky entrance/exit over some steeps rocks, you will definitely want to get to this one by boat. The wreck is only really dived during the summer season when the wind is predominantly a south-easter which results in an upwelling of clean water along this side of the peninsula. In addition, the south-easter can be particularly vicious at times and Maori Bay is relatively sheltered from this wind. During this season (October - February) however, most of the local charter operators will dive this site fairly often so finding someone who's launching there shouldn't be too much of a problem.

The Dive
The BOS 400 is one of the most dived wrecks on the Atlantic seaboard. As already mentioned, it is located just off Duiker Point in Maori Bay, which is also affectionately known as "The Fridge" amongst the local diving community. You can expect temperatures of around 8°C-10°C but it does get as low as 4°C so be warned. The plus side of the cold water is that, as a rule of thumb, the colder the water the better the visibility and the visibility can be as good as 30m if you're lucky. The wreck is easily visible as it some of it sits out of the water and as such the depth of your dive will range from shallow (5m) to about 20m at the deeper sections. This also means there's something for everyone and it's accessible to divers of all qualifications.
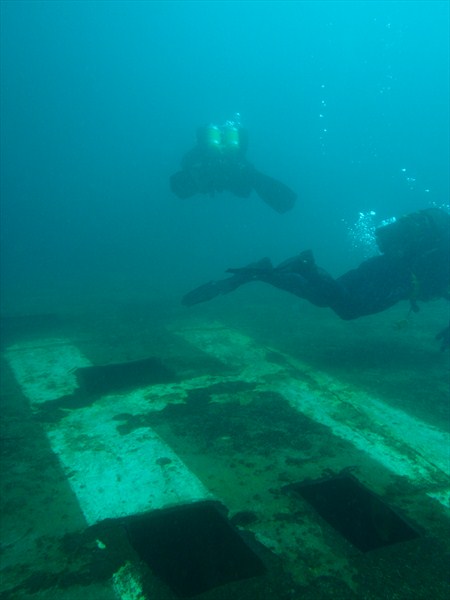
Life on the wreck is fairly indicative of what one sees on the Antlantic peninsula - lots of colourful sponges, soft corals, anemones, kelp and, my personal favourite, nudibranchs like this gas flame nudi. However, the marine life is generally better on other sites so your main interest here is the wreck itself. Initially, most of the wreck sat out of the water and there were limited penetration possiblities that were particularly difficult because of the shallow nature of the dive and the surge generated being so shallow and close to the rocks. However, the wreck has detoriated significantly in the last couple of years. The helipad which forms part of the challenge in this cache only collapsed in Sept 2010. And in September 2011 a large part of the mid section of the barge collapsed as well. Generators, hydraulics, cabling and other structural components that were either above water or only accessible by penetration are now lying exposed on the seafloor and as such it is now a far more interesting dive.
If you haven't dived the wreck before, the best source of information on what to expect is of course the operator taking you out to the dive site. If you want to read up beforehand, the following wikitravel article provides a great overview on the site and also of the SS Oakburn (which extends out from the stern of the Boss).
The Cache
Most operators will probably drop you very close to, if not on, the helipad. If they do not, then ask them to do so and they will most likely happily oblige (or at least drop you close by and tell you where to go). Either way, make your way to the WNW side (the deeper side) of the helipad. You will notice that the helipad is not perfectly round and is more like a giant polygon. If you look at the edge you will see some round port-hole like holes through the metal (see photo). I was initially going to make you count all of them around the entire helipad but this became quite a mission and gets quite hard because of the amount of kelp that is already growing on the higher (shallower) section of the helipad. So, you need to find out how many of these are there per side of the polygon that forms the helipad (i.e. between any 2 "corners"...). I checked 4-5 sides and they all had the same number of holes - although the placement of the holes differs on each side and could be potentially confusing as the hole gets closer to the "corner". If in doubt, check more than 1 side just to be sure. Let this number be A.

Hole through Helipad: A = no of these along 1 edge of the helipad
At each of the corners on the helipad you will see what I call a corner post (or at least see evidence of one). This is essentially just a piece of metal extending from the corner. On either side of the post are 2 shorter extending pieces of metal with a small piece of vertical, round pipe attached to the end of them (see attached photo). How many of these shorter extensions are there along one side of the helipad (i.e. between 2 corner posts). Let this number be B.
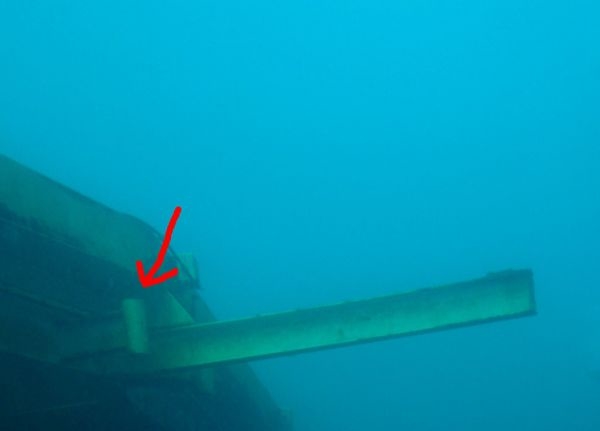
Helipad "extensions": B = no of these along 1 edge of the helipad
From there leave the helipad and swim along the length of the wreck following the coastline essentially. Initially you will come to section where (at the time of placing the cache) there is a large piece of metal plating supported by rocks. You can easily swim underneath and along for quite a distance. But for now I wouldn 't recommend you do as you'll need to be looking out on you right for a large compartment (looks kind of like a container) that broke free of the rest of the wreckage. It has some large pipes coming out of the back and some fencing/railings running around the top. There are 2 main entrances - one along the length (facing the shore) and one along the width at the western side (the far side from where you will approach). The deepest part of the "container" was at 20m on the day we dived at which point it was also quite close to high tide. So, the first thing you need to do is count the number of vertical fence posts (excluding the corner posts) along the length of the compartment above the entrance. Let this be C.
Fencing on top of part of wreckage: C = no of fence posts excl. corner posts along length
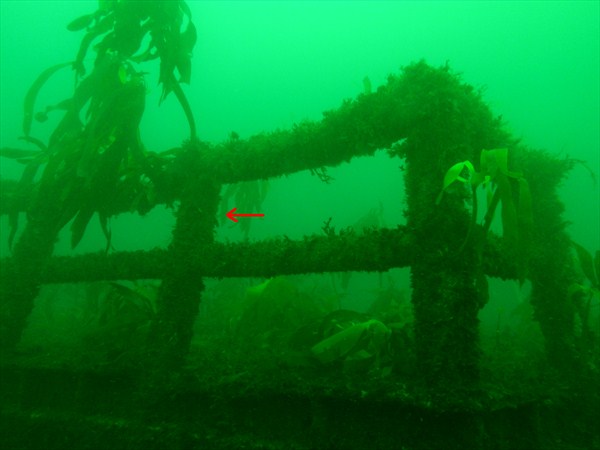
Then, go into the entrance below the fence you just counted (i.e. along on the length). You will see the other entrance diagonally opposite and left of you as well as another entrance/exit/hole in the ceiling across and slghtly left of you (i.e. almost the exact view from which the photo below was taken). As you go through the entrance immediately look up. You will notice that ceiling of the compartment has been broken into a number of sections by support beams that run along the length and width of the compartment. D = the number of sections into which the width of the compartment is broken by these support structs. The arrows in the picture below give you an indication of what I'm referring to (except the example is on the side and you need to be looking at the roof). Just to be sure, there are the same number of support structs as the no. of fence posts so D = C + 1. Then, proceed to the other entrance as shown in the picture below. E = the no of vertical sections (as shown by the arrows in the picture below) to the left of the entrance (when looking form the inside out).
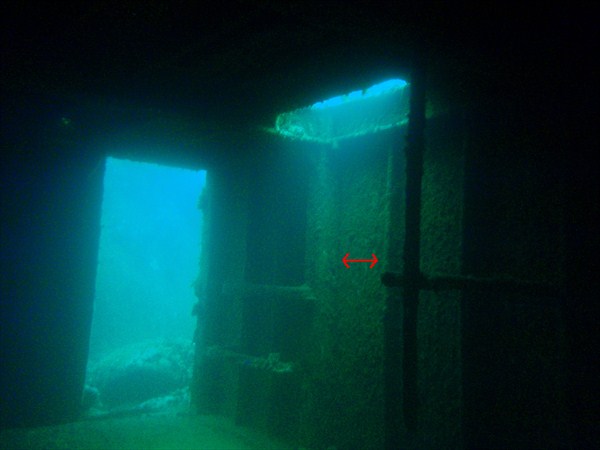
Inside wreckage: D & E = no. of sections separated by supporting bars (image taken from
wikitravel article)
Great stuff you've now collected all the info required to find the final... Enjoy the rest of your dive. The final is located at S34 B*A/E+B.(E+B)*(E-B) E018 E+D+A*B.D*E*(A*C-1). Contents of the cache are SCUBA/ocean themed - I've tried to make the cache large enough to handle a SCUBA related item or 2 (your BC won't fit though). NB: Please be sure to stow and cover cache properly when you are done!
FTF honours go to AndyT1, capeccr, Paddawan and Adilawson. Congrats!