Geology of Fjords
The seeds of a fjord are laid when a glacier cuts a U-shaped valley through abrasion of the surrounding bedrock by the sediment it carries. Many such valleys were formed during the recent ice ages. Glacial melting is also accompanied by a rebound in the earth's crust as the ice load is removed. In some cases this rebound may be faster than the sea level rise. Most fjords are, however, deeper than the adjacent sea; Sognefjord, Norway, reaches as much as 1,300 m (4,265 ft) below sea level. Fjords generally have a sill or rise at their mouth caused by the previous glacier's terminal moraine. These characteristics distinguish fjords from rias (e.g. the Bay of Kotor), which are drowned valleys flooded by the rising sea.
Fjords in Norway
Norway lies in a weak tectonical zone, so the rivers could easily dig themselves into the soft rock. During the 22 ice ages, which are known in scandinavia, Norway was completely covered by glaciers. The preformed riverbeds turned into U-formed valleys during the icy periods. Between the ice ages, the meltwater reformed the valley into V-valleys. Since there were 22 ice ages, the valleys were formed and reformed rather often so that there were plenty of deep fjords, which were still dry at this time. After the last ice age, the global warming caused a rise of the sealevel for about 90 m and the fjords were flooded.
http://www.directcruises.com/
http://en.wikipedia.org/wiki/Fjord
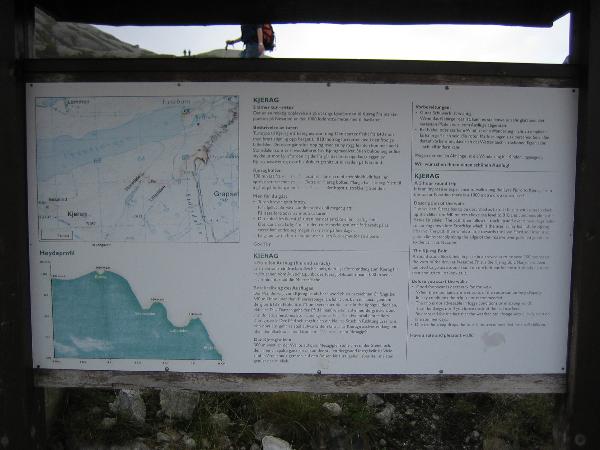
Lysefjorden
|
One of these fjords is the Lysefjorden near Stavanger. The name means “light fjord”, and is said to be derived from the lightly coloured granite rocks along its sides.
End to end, it measures 42 km (23 miles) with rocky walls falling nearly vertically over 1000 m (3,000 ft) into the water. The rocks along the fjord consist of granite, which was formed over 350 million years ago and which is abraded by rain and especially the former glaciers.
Lysefjorden is one of the most famous attractions of southern Norway and thousands of people visit it each year.
|

Preikestolen at Lysefjorden
Click to enlarge
|
|
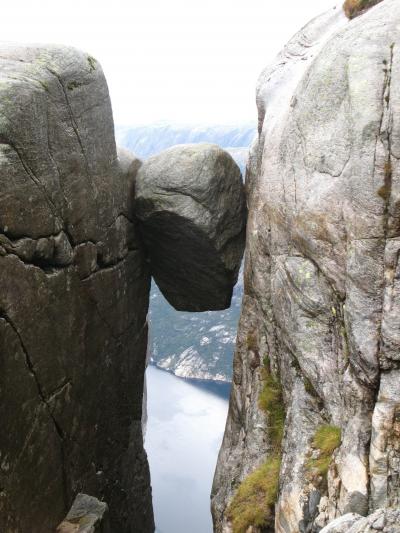
The Kjeragbolten
Click to enlarge
|
There are two incredible freaks of nature along the Lysefjorden.
One of it is the famous Preikestolen (N 58° 59.100 E 006° 11.150), which is a massive cliff about 600 meters above the fjord. Its plateau is about 25 x 25 meters wide and nearly flat.
The other one is even more spectacular and impressively shows what forces formed the mountains in southern Norway. The Kjeragbolten (N 59° 02.015 E 6°35.594) is a big rock which fell into a crevice and got stuck there.
The smooth walls of rock nearby show the visitor the power of eroding water, which still flows from top of Kjerag-plateau.
|
The way to Preikestolen
For coordinates of parking lot and the pulpit rock itself see "Additional Waypoints" below!
|

Ferry Lauvvik-Oanes
Click to enlarge
|
Coming from Stavanger, take the 13 in Sandness and drive to Lauvvik.
Take the ferry from Lauvvik to Oanes. The boat leaves every 30 minutes and needs about 10 minutes to ferry across. The price depends on what you are traveling with. Two adults and a car cost about 80 kr.
A detailed timetable for this and other ferries in the area, you can find ttp://www.preikestolhytta.no (Click for more information).
|
|
Once you crossed Høgsfjorden by boat it is quite easy to find the parking lot of Preikestolen.
Drive northern on the 13, cross the Idsefjorden over the bridge and turn right to Preikestolhytta.
After a short ride you will reach Preikestolhytta and the parking lot. Plan about 60 kroner for the parking charge for the whole day.
Get into your hiking boots, mount you backpack and start your hike towards Preikestolen. 
|
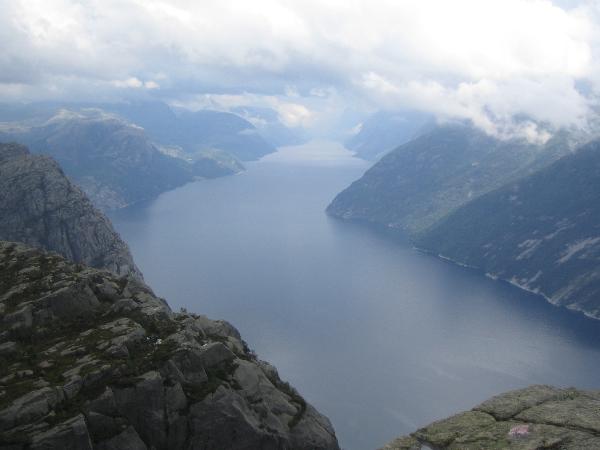
Lysefjorden view from Preikestolen
Click to enlarge
|
|

Preikestolen hiking-map
Click to enlarge
|
WARNING: The path up to Preikestolen is very rocky and steep. We saw a lot of people running up the hill in unsuitable shoes, e.g. flip-flops. Be sure to wear appropriate shoes and watch your step.
As you can see on the hiking map, there are four plateaus to "climb" onto until you reach Preikestolen. The complete trip takes about 5-6 hours, in order you want to spend some time on this famous rock and look for the Preikestolen-Cache (which is definitely recommended!  )! )!
|
The way to Kjerag
For coordinates of parking lot and Kjeragbolten itself see "Additional Waypoints" below!
|
There are two different ways to get to the Kjeragbolten.
The first is by boat; take the ferry from Lauvvik to Lysebotn all through the Lysefjord (Click here for more information). It is also possible to take a car-ferry.
When you reach Lysebotn, get up the serpentines in the south until to Øygardstølen.
|

Parking lot Øygardstølen
Click to enlarge
|
|
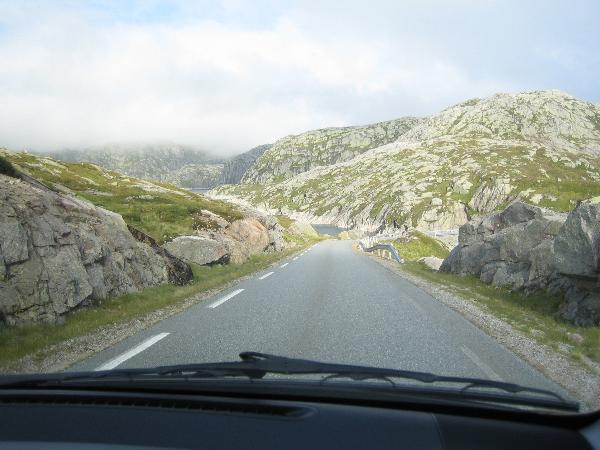
Road to Kjerag
Click to enlarge
|
The other way is by car.
Coming from Stavanger, take the E39 out of town an turn east on the 45 near Algård. Follow the 45 to Byrkjedal and turn left towards Sirdal/Sinnes. Near Øvstebø you will face an automatic toll-station. Read the signs in front of it how to pay the fee manually. In Sinnes turn north towards Fidjeland an then turn left towards the road to Lysebotn.
WARNING: The road is steep and narrow. Be sure to drive carefully. Head for the “Kjerag parking-lot” at Øygardstølen.
Plan about 80 kr for the parking charge for the whole day.
|
|
At Øygardstølen you will find the start of the trailhead up to the Kjerag plateau.
WARNING: The trail is even harder than up to Preikestolen and there are three tough climbs to solve until you reach the top-plateau. Be sure to wear a pair of good hiking shoes and do not try to walk alone. You need to follow the T-marked “path” and you will find the way up.
The Kjeragbolten itself is only somewhat away, once you reached the plateau. The trip to the Bolten and the return to Øygardstølen takes about 6 hours.
|
Kjerag hiking-map
Click to enlarge
|
Concerning this Earth-Cache:
In order to log this earthcache, you have to solve four tasks.
- When you are at Preikestolen, you will see an alarming crack between the pulpit and the rocky wall. Find out how broad this crack is and reconsider where you are standing. eMail this value to us.
- When you are standing in front of Kjeragbolten, take a guess how broad the area is on which you are able to stand on the rock. Than look on your GPS and tell us how many meters above sea level you are standing right now. Please eMail us both values.
Although not need for logging the EC it would be nice to attach pictures from both sites to you log! See example picture 1 and see example picture 2
We hope you enjoyed your trip to this beautiful geological site. We did and we will never forget this trip in our whole life! If you have any questions concerning this Earthcache, don't be shy and contact us via GC.com!
Sandra & Stephan
Havrix